Diferență între revizuiri ale paginii „Software Development Kit”
| (Nu s-a afișat o versiune intermediară efectuată de același utilizator) | |||
| Linia 1: | Linia 1: | ||
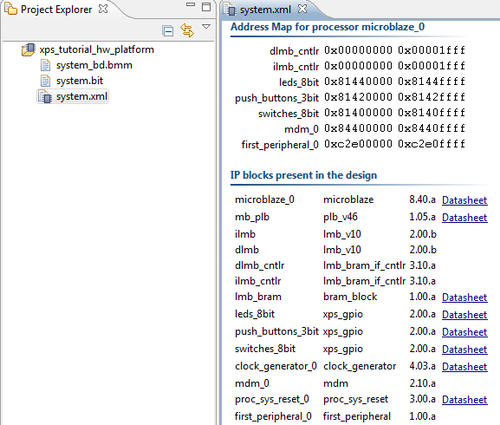
The Software Development Kit allows a user to create software projects for hardware platforms already configured in XPS. The graphical user interface is based on Eclipse and permits source editing, running, debugging and connecting to development boards through JTAG. After you have [[Xilinx_Platform_Studio#Exporting_to_SDK|exported your hardware project]], you are ready to create software applications. The hardware project will appear in the '''Project Explorer''' panel and shows information about address spaces and available peripherals. | The Software Development Kit allows a user to create software projects for hardware platforms already configured in XPS. The graphical user interface is based on Eclipse and permits source editing, running, debugging and connecting to development boards through JTAG. After you have [[Xilinx_Platform_Studio#Exporting_to_SDK|exported your hardware project]], you are ready to create software applications. The hardware project will appear in the '''Project Explorer''' panel and shows information about address spaces and available peripherals. | ||
| − | [[Fișier:SDKhwproject.png]] | + | [[Fișier:SDKhwproject.png|500px]] |
== Creating a Software Project == | == Creating a Software Project == | ||
| Linia 7: | Linia 7: | ||
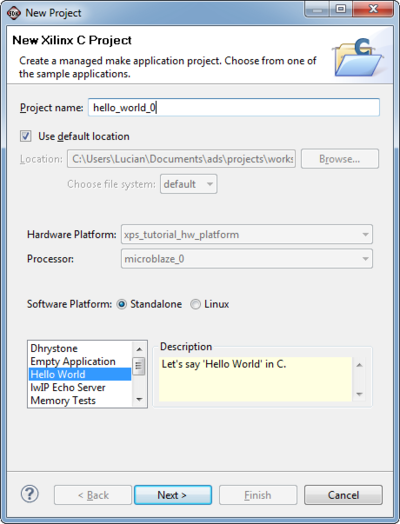
SDK allows easy creation of blank project or template projects for Xilinx Microblaze systems. Click on '''File -> New -> Xilinx C Project''' for the project creation wizard to start. This wizard allows the user to select a template from which the project will be created. Select the template '''Hello World''' and click '''Next'''. In the following wizard window, click '''Next''' again for the project to be generated. | SDK allows easy creation of blank project or template projects for Xilinx Microblaze systems. Click on '''File -> New -> Xilinx C Project''' for the project creation wizard to start. This wizard allows the user to select a template from which the project will be created. Select the template '''Hello World''' and click '''Next'''. In the following wizard window, click '''Next''' again for the project to be generated. | ||
| − | [[Fișier:SDKCreateProject.png]] | + | [[Fișier:SDKCreateProject.png|400px]] |
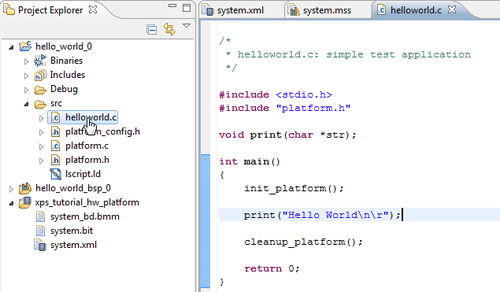
Once the project generation is finished, the software project appears in the '''Project Navigator''' and you can edit source files and view executables. In this case, a source file is generated which prints out '''Hello World''' to the standard output, which in our case is JTAG UART. | Once the project generation is finished, the software project appears in the '''Project Navigator''' and you can edit source files and view executables. In this case, a source file is generated which prints out '''Hello World''' to the standard output, which in our case is JTAG UART. | ||
| − | [[Fișier:SDKEditSource.png]] | + | [[Fișier:SDKEditSource.png|500px]] |
| − | The project will be built automatically but the user can also initiate a build by right-clicking the project and selecting '''Build | + | The project will be built automatically but the user can also initiate a build by right-clicking the project and selecting '''Build'''. |
| − | + | == Programming the FPGA Board == | |
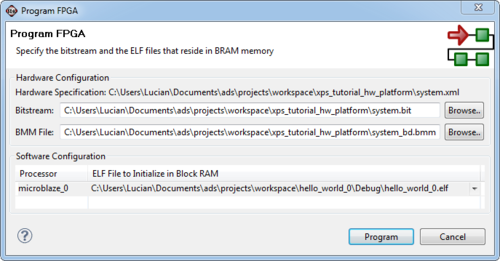
| − | + | Before the project can be run, the board FPGA must be loaded with the bitfile generated from the XPS project. This can be done in XPS and also in SDK, by clicking the '''Program FPGA''' button. This will cause a pop-up window to appear. Select the hello_world project from the drop-down menu under '''Software Configuration'''. | |
| − | [[Fișier:SDKRunonHW.png]] | + | [[Fișier:SDKProgramFPGA.png|500px]] |
| + | |||
| + | The FPGA will now be programmed. For this to succeed, the Nexys-2 board must be connected to the computer via the USB cable, and the board must be turned on. A successful programming operation will be signaled by SDK and also will cause a yellow LED to activate on the board. | ||
| + | |||
| + | == Running and Debugging == | ||
| + | |||
| + | Once the board is programmed, the software project can be run or debugged from SDK. | ||
| + | |||
| + | [[Fișier:SDKRunonHW.png|500px]] | ||
Versiunea curentă din 17 noiembrie 2012 13:19
The Software Development Kit allows a user to create software projects for hardware platforms already configured in XPS. The graphical user interface is based on Eclipse and permits source editing, running, debugging and connecting to development boards through JTAG. After you have exported your hardware project, you are ready to create software applications. The hardware project will appear in the Project Explorer panel and shows information about address spaces and available peripherals.
Creating a Software Project
SDK allows easy creation of blank project or template projects for Xilinx Microblaze systems. Click on File -> New -> Xilinx C Project for the project creation wizard to start. This wizard allows the user to select a template from which the project will be created. Select the template Hello World and click Next. In the following wizard window, click Next again for the project to be generated.
Once the project generation is finished, the software project appears in the Project Navigator and you can edit source files and view executables. In this case, a source file is generated which prints out Hello World to the standard output, which in our case is JTAG UART.
The project will be built automatically but the user can also initiate a build by right-clicking the project and selecting Build.
Programming the FPGA Board
Before the project can be run, the board FPGA must be loaded with the bitfile generated from the XPS project. This can be done in XPS and also in SDK, by clicking the Program FPGA button. This will cause a pop-up window to appear. Select the hello_world project from the drop-down menu under Software Configuration.
The FPGA will now be programmed. For this to succeed, the Nexys-2 board must be connected to the computer via the USB cable, and the board must be turned on. A successful programming operation will be signaled by SDK and also will cause a yellow LED to activate on the board.
Running and Debugging
Once the board is programmed, the software project can be run or debugged from SDK.


