Applications 7
The counter is one of the most used digital blocks and surely one of the best known outside the world of electronics. Any microprocessor has a program counter, without which it can not run programs on the computer. The program counter generates a sequence of memory addresses in ascending order, one in each clock period, and occasionally jumps in the program to an address other than the next one.
Example 1
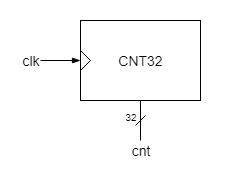
32 bit Counter : Behavioral description
The simplest counter of all, in terms of functionality, uninterruptedly generates an ordered sequence of numbers, cycle by cycle. An upward counter generates the sequence in increasing order: 0, 1, 2, 3, 4 a.s.o., After it reaches the highest number, with all bits 1, the next cycle it turns around to all bits 0.
As an automaton, the counter may be regarded as a register with an incrementer closing the outer loop. The behavioral description needs only a sequential always process to update the counter value, and an assignment for the next value of the counter.
always @(posedge clk) begin
    cnt <= cnt + 1;
end
- create a new project
- create a new verilog source file for cnt32, and describe it as shown above
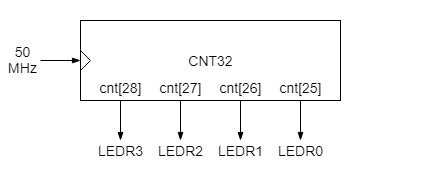
- assign fpga pins to connect an external clock (use CLOCK_50 clock) and LEDs to four of the output bits, as indicated below
- compile and program the FPGA. The red LEDs should be blinking, LEDR0 nearly once a second, LEDR1 twice slower, LEDR2 twice slower than LEDR1 a.s.o.
32 bit Counter : Initial state
- in the same project add a verilog file for cnt32_tb. In the testbench you need only to generate the clock. Simulate and observe the counter output waveform.
Why the output of cnt32 is completely unknown in simulation, whereas its output on FPGA works as expected?
However, if you looked carefully how the LEDs started blinking immediately after the FPGA had been programmed, you noticed that they started from a random configuration (some LEDs light on, the others off). The initial configuration of counter's internal flip-flops is unknown at power-up. They clearly settle after power-up at some logic values, but those values cannot be predicted. The simulator cannot guess them, so it starts with an unknown value, and incrementing an unknown value you get also an unknown value.
A workaround to initialize the cnt variable in simulation is to force its value from outside the cnt32 module, directly from the testbench module.
During simulation we can have direct access to any (variable) signal inside the tested module if we use its full name, an unique name within the block hierarchy of the dut instance. The full name of a signal is written in the same way the full name of a variable in an object-oriented program is written:
topInstanceName.signal

topInstanceName.blockInstanceName.signal

topInstanceName.blockInstanceName.subblockInstanceName.signal
In the case of our counter, if in the test module its instance is named dut, the cnt variable can be initialized in step 0 of the simulation directly from the testbench module:
initial dut.cnt=0;
This mode of access should be used with parsimony and only in test modules. It is not a synthesized statement and cannot be used in design modules! It is recommended to use direct access in test modules only for the purpose of reading (monitoring) variables that are not accessible trough the top-level design interface.
Attention!
- It is forbidden in a design module to use direct access to an internal signal of another module.
Much more elegant is to provide the counter with a reset or clear input, that is used to initialize the counter at the reset or to bring the counter to the initial state whenever needed.
32 bit Counter : Reset
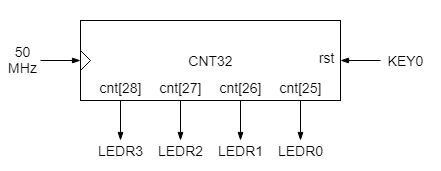
- add the rst pin to cnt32 module, and change the sequential process such that the counter is set to 0 if reset is applied. rst is synchronous and active 0.
- add an initial process to the testbench to apply the reset pulse for at least two clock cycles. Rerun the simulation and see the effect of the reset.
- assign a pushbutton (KEY0) to rst input. The pushbutton pin stays at logic 1 while the button is not touched, and receives 0 if you push the button.
- compile and program the FPGA
32 bit Counter : Count enable
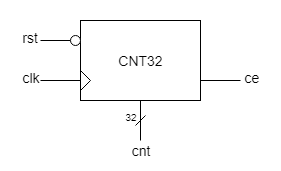
It is useful for many counter applications to be able to sometime freeze the counting. An additional control signal, counter enable (ce), enables the counting only when it's active.
- add the ce pin to cnt32 module, and change the sequential process such that the counting is enabled only if ce is 1.
always @(posedge clk) begin
    if(~rst) begin
        // initialization at reset
    end
    else begin
        // everything else, including count enable control
    end
end
- add another initial process to the testbench to change from time to time the ce value.
- assign a switch (SW0) to ce input
- compile and program the FPGA
32 bit Counter : Synchronous load
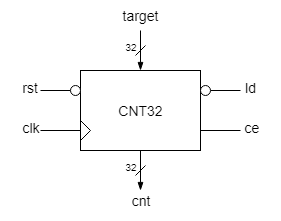
Another very useful feature is to bring the counter state to whatever desired value (target value). This feature makes easy the design of frequency dividers and lots of counter based automata.
When load input (ld) is active, the active clock edge causes the counter to load the value of the target input. If both control inputs (ld and ce) are active, the load command has priority. All functions of this counter can be arranged in a table:
| ld | ce | next cnt value | function |
| 0 | X | target | load |
| 1 | 0 | cnt | freeze |
| 1 | 1 | cnt+1 | count |
The X in the first row means that the value of ce input doesn't matter (it may be either 0 or 1) because ld has priority over ce. The truth table can thus be substantially compressed. Instead of two separate rows for the input combinations (ld=0, ce=0) and (ld=0, ce=1), for which the function is the same (load), a single combintion is used (ld=0, ce=X).
This compaction can also be used in Verilog table constructions, such as the 'case' statement. In order to use the X value in specifying the cases of the instruction, the alternative casex statement, which has the same format as the case statement, must be used:
casex (expression_case)
    value1: instruction1
    ...
    default: instruction
endcase
Unlike the case block, which admits only precise numerical values for each branch, the casex block allows some bits to be undefined for some branches. For example, the combinations for active ld can be combined into a single branch:
casex({ld,ce})
    2'b0X: out <= target;
    // other cases
endcase
which is equivalent to:
case({ld,ce})
    2'b00,
    2'b01: out <= target;
    // other cases
endcase
- change cnt32 behavioral description to conform to a synchronous counter with a synchronous load.
- add an initial process in the testbench to load a particular target value after some time. Try to reproduce the stimuli scenario from the figure below and see if you get the same output as in the figure:
