Applications 9
always @(posedge clk) begin
    if(~rst)
        state <= INIT_STATE;
    else begin
        case(state)
        // for each state
        endcase
    end
end
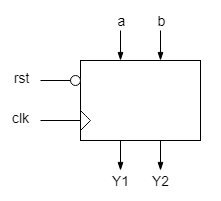
Design an automaton that determines the order in which two buttons are pressed. The buttons generate logic signals, a and b, that are 1 if the corresponding button is pressed. The automaton has two logic outputs, Y1 and Y2. Y1 is asserted if a was pressed first, followed by b. Y2 is asserted if b was pressed first, followed by a. The outputs remain asserted until reset. The reset is active 0.
Exercise 1
Moore FSM
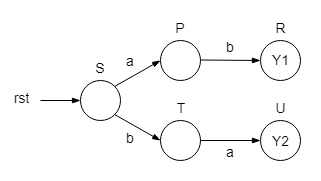
The circuit may be designed as a Moore FSM, with two separate states for those two particular output configurations. In the graph below only the transitions to different states are shown. If their conditions are not met, the FSM stays in the current state, whatever it is. In the final states, R or U, the automaton stays until reset. From any state the reset forces the FSM to its initial state, S.
State coding
It is not recommended to use explicit values whenever the state variable is used. To make code much more readable and easier to design and debug, the state values are parameters. Another advantage of using parameters is that the state explicit values are declared in a single place, at parameter declaration, therefore if their values need to be changed, only the parameter declaration is affected.
The state values are internal design options, therefore the parameters used for states are local ones. They are declared as local parameters, using the template localparam name=value; The names of parameters are upper case letters, and may include digits and underline.
localparam STATE_S = 3'd0;
localparam STATE_P = 3'd1;
Attention!
- The state values must be distinct! Otherwise you may end with a state having multiple names.
- Local parameter declarations are the first statements after the module interface. The order of statements for a module should be the following:
- module
- interface declaration (the list of inputs and outputs)
- localparam declarations
- internal wire and reg declarations
- description (structural with instantiations or behavioral with always processes and continuos assignments)
- endmodule
State transitions
All transitions are grouped in a single sequential always process, with a case statement that groups transitions by current state. The combinational function that computes the next state (the transition function) is implicitly described by the case statement and the statements for each case. The state is updated sequentially because the always process is sensitive only to clock edges.
always @(posedge clk) begin
    if(~rst)
        state <= STATE_S;
    else begin
        case(state)
        STATE_S: begin
            if(a)
                state <= STATE_P;
            else if(b)
                state <= STATE_T;
            else
                state <= state; // stays in the same state
        end
        STATE_P: begin
            if(b)
                state <= STATE_R;
            else
                state <= state;
        end
        // other states with their transitions
        default:
                state <= STATE_S; // from undefined states jump to the initial state
        endcase
    end
end
Attention!
- All assignments inside the sequential process are done with the nonblocking assignment operator,
<= - Don't forget the default case!
- The reg variable for the state must be declared with the required number of bits, which is the same as the number of bits declared for each value of the state value parameters.
Outputs
Since Moore outputs depend only on state they are described either through continuous assignments or inside a combinational always process.
If continuous assignments are used, the outputs are assigned logic expressions based on state:
assign y1 = (state == R);
The combinational always process is preferred when state values are easier to group by states:
always @(*) begin
    case(state)
    STATE_S: {y1, y2} = 2'b00;
    STATE_P: {y1, y2} = 2'b00;
    STATE_R: {y1, y2} = 2'b10;
    // other states with their outputs
    default: {y1, y2} = 2'b00;
    endcase
end
Attention!
- All assignments inside the combinational process are done with the blocking assignment operator,
= - Don't forget the default case!
Requirements
- Create a new project in a new folder
- Design the automaton as the top level design entity
- Design a testbench with the input signals generated as in the figure below.
- Run simulation. If the design is correct the outputs should appear as in the figure.
- To implement the design assign KEY0, SW1 and SW2 to rst, a, and b inputs. Assign LEDR1 and LEDR2 to y1 and y2 outputs.


