Diferență între revizuiri ale paginii „FPGA Student Classroom tutorial”
(→==) |
|||
| Linia 1: | Linia 1: | ||
| − | + | == FPGA Student Classroom Access Tutorial == | |
| − | This is a guide that aims to show how to connect to the classroom resources remotely, in order to access the software and hardware resources (FPGAs) available at the university. The goal is to create a remote desktop session to one of the computers in the lab. This session can then be used to run software ( | + | This is a guide that aims to show how to connect to the classroom resources remotely, in order to access the software and hardware resources (FPGAs) available at the university. The goal is to create a remote desktop session to one of the computers in the lab. This session can then be used to run software (e.g., Vivado) and to program hardware FPGAs. |
Before you can connect to the classroom cluster, you will need to obtain the following from a system administrator: | Before you can connect to the classroom cluster, you will need to obtain the following from a system administrator: | ||
| − | * | + | * A VPN configuration file (e.g., fsc00-myname.conf) |
| − | * | + | * A username and password |
| − | * | + | * An assigned workstation and FPGA board (e.g., station07 & pynq07) |
The connection process consists of the following steps: | The connection process consists of the following steps: | ||
| − | + | # Connect via VPN to the cluster network. | |
| − | + | # Connect to your workstation via SSH and create a remote desktop (VNC) instance. | |
| − | + | # Connect to the remote desktop instance. | |
| − | Step 1 | + | == Step 1 - VPN == |
| − | |||
| − | To connect to the cluster network via VPN you will need the provided VPN configuration file ( | + | To connect to the cluster network via VPN, you will need the provided VPN configuration file (e.g., fsc00-myname.conf) and a WireGuard VPN client. |
| − | For a full guide on how to use the | + | For a full guide on how to use the WireGuard VPN, check [this page](https://link). |
| − | Step 2 | + | == Step 2 - SSH == |
| − | |||
In order to connect to your workstation via SSH to open the remote desktop instance, you will need a terminal application or a dedicated SSH client. | In order to connect to your workstation via SSH to open the remote desktop instance, you will need a terminal application or a dedicated SSH client. | ||
| − | Windows 11 comes with Windows Terminal. Windows 10 users can download the [Windows Terminal](https://apps.microsoft.com/detail/9n0dx20hk701) from the Microsoft Store or use the older Command Prompt application. | + | * **Windows 11** comes with Windows Terminal. Windows 10 users can download the [Windows Terminal](https://apps.microsoft.com/detail/9n0dx20hk701) from the Microsoft Store or use the older Command Prompt application. |
| + | * **macOS** has a pre-installed Terminal application. [iTerm2](https://iterm2.com/) is a popular community alternative with more features. | ||
| − | + | First, connect to the workstation using the following command: | |
| − | + | <syntaxhighlight lang="bash"> | |
| + | ssh myname@station07 | ||
| + | </syntaxhighlight> | ||
| − | + | If this is your first time logging in, you will be prompted to change your initial password: | |
| − | |||
| + | <syntaxhighlight lang="bash"> | ||
(myname@station07) Password: | (myname@station07) Password: | ||
Password expired. Change your password now. | Password expired. Change your password now. | ||
| Linia 43: | Linia 44: | ||
myname@station07:~$ | myname@station07:~$ | ||
| − | + | </syntaxhighlight> | |
| − | Replace `myname` and `station07` with your username and | + | Replace `myname` and `station07` with your assigned username and workstation. |
| − | + | Once connected, launch a VNC instance with: | |
| − | + | <syntaxhighlight lang="bash"> | |
| + | vncserver -localhost no | ||
| + | </syntaxhighlight> | ||
| − | + | If this is your first time starting a VNC instance, you will be prompted to set a password. You will also need to note the **VNC port** and **X display number** from the output. If you forget these numbers, you can retrieve them with: | |
| − | |||
| − | + | <syntaxhighlight lang="bash"> | |
| + | vncserver -list | ||
| + | </syntaxhighlight> | ||
| − | + | To stop the VNC session, use: | |
| − | |||
| − | |||
| − | |||
| − | |||
| − | + | <syntaxhighlight lang="bash"> | |
| − | + | vncserver -kill :3 | |
| + | </syntaxhighlight> | ||
| − | + | Replace `:3` with your actual X display number. | |
| − | |||
| − | |||
| − | |||
| − | |||
| − | |||
| − | |||
| − | |||
| − | |||
| − | |||
| − | |||
| − | |||
| − | |||
| − | |||
| − | |||
| − | |||
| − | |||
| − | |||
| − | |||
| − | |||
| − | |||
| − | + | == Step 3 - VNC == | |
| − | + | To connect to your workstation using VNC, you will need a VNC client. **TigerVNC** is a popular choice, though others like RealVNC, TightVNC, and Remmina are also available. | |
| − | + | * **Windows:** Download TigerVNC from [here](https://sourceforge.net/projects/tigervnc/files/stable/1.15.0/). | |
| + | * **macOS:** Download TigerVNC from [here](https://tigervnc.macupdate.com/). | ||
| + | * **Linux:** Install TigerVNC via Flatpak: | ||
| − | + | <syntaxhighlight lang="bash"> | |
| + | flatpak install flathub org.tigervnc.vncviewer | ||
| + | </syntaxhighlight> | ||
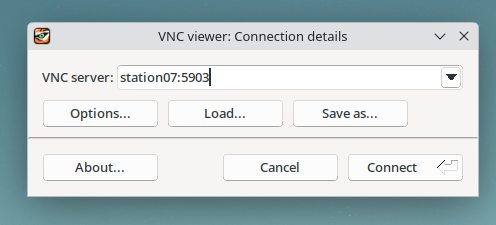
| − | Once | + | Once installed, enter your workstation name followed by a colon and the VNC port (e.g., `station07.fsc00.arh.pub.ro:5903`). |
| − | + | [[File:Tigervnc.png|1500px|thumb|Enter your workstation and port here.]] | |
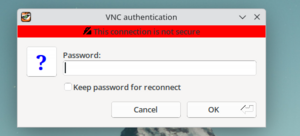
| − | Click | + | Click **Connect**, then enter your **VNC session password** (not your account password). |
| − | + | [[File:TigerVNC_password.png|thumb|Enter your VNC password here.]] | |
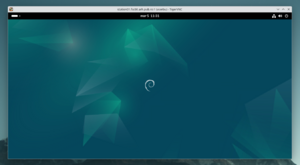
| − | If | + | If successful, you will see your remote desktop. |
| + | [[File:GNOME_desktop.png|thumb|You are now connected!]] | ||
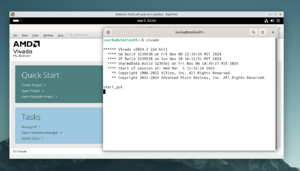
| − | + | You can now open a terminal and launch Vivado: | |
| + | <syntaxhighlight lang="bash"> | ||
| + | vivado | ||
| + | </syntaxhighlight> | ||
| − | + | [[File:Vivado_open.png|thumb|Vivado running on remote desktop.]] | |
| − | + | == FAQ == | |
| − | + | '''Q: I cannot connect to my VNC session.''' | |
| + | A: Connect via SSH and check with `vncserver -list`. Ensure the VNC server was started with `-localhost no`. | ||
| − | Q: I | + | '''Q: I cannot connect via SSH; my workstation appears to be powered off.''' |
| − | A: | + | A: Some students turn off the stations despite instructions. Contact a system administrator to power it on remotely. |
| − | Q: I can | + | '''Q: I can connect to VNC, but I see a login screen and an "Authentication error" message.''' |
| − | A: | + | A: This is a [known bug](https://askubuntu.com/questions/1224957/i-cannot-log-in-a-vnc-session-after-the-screen-locks-authentification-error) in TigerVNC. While connected via VNC, open an SSH session and run: |
| − | + | <syntaxhighlight lang="bash"> | |
| − | + | loginctl unlock-sessions | |
| + | </syntaxhighlight> | ||
Versiunea de la data 8 martie 2025 14:50
FPGA Student Classroom Access Tutorial
This is a guide that aims to show how to connect to the classroom resources remotely, in order to access the software and hardware resources (FPGAs) available at the university. The goal is to create a remote desktop session to one of the computers in the lab. This session can then be used to run software (e.g., Vivado) and to program hardware FPGAs.
Before you can connect to the classroom cluster, you will need to obtain the following from a system administrator:
- A VPN configuration file (e.g., fsc00-myname.conf)
- A username and password
- An assigned workstation and FPGA board (e.g., station07 & pynq07)
The connection process consists of the following steps:
- Connect via VPN to the cluster network.
- Connect to your workstation via SSH and create a remote desktop (VNC) instance.
- Connect to the remote desktop instance.
Step 1 - VPN
To connect to the cluster network via VPN, you will need the provided VPN configuration file (e.g., fsc00-myname.conf) and a WireGuard VPN client.
For a full guide on how to use the WireGuard VPN, check [this page](https://link).
Step 2 - SSH
In order to connect to your workstation via SSH to open the remote desktop instance, you will need a terminal application or a dedicated SSH client.
- **Windows 11** comes with Windows Terminal. Windows 10 users can download the [Windows Terminal](https://apps.microsoft.com/detail/9n0dx20hk701) from the Microsoft Store or use the older Command Prompt application.
- **macOS** has a pre-installed Terminal application. [iTerm2](https://iterm2.com/) is a popular community alternative with more features.
First, connect to the workstation using the following command:
ssh myname@station07
If this is your first time logging in, you will be prompted to change your initial password:
(myname@station07) Password:
Password expired. Change your password now.
(myname@station07) Current Password:
(myname@station07) New password:
(myname@station07) Retype new password:

myname@station07:~$
Replace `myname` and `station07` with your assigned username and workstation.
Once connected, launch a VNC instance with:
vncserver -localhost no
If this is your first time starting a VNC instance, you will be prompted to set a password. You will also need to note the **VNC port** and **X display number** from the output. If you forget these numbers, you can retrieve them with:
vncserver -list
To stop the VNC session, use:
vncserver -kill :3
Replace `:3` with your actual X display number.
Step 3 - VNC
To connect to your workstation using VNC, you will need a VNC client. **TigerVNC** is a popular choice, though others like RealVNC, TightVNC, and Remmina are also available.
- **Windows:** Download TigerVNC from [here](https://sourceforge.net/projects/tigervnc/files/stable/1.15.0/).
- **macOS:** Download TigerVNC from [here](https://tigervnc.macupdate.com/).
- **Linux:** Install TigerVNC via Flatpak:
flatpak install flathub org.tigervnc.vncviewer
Once installed, enter your workstation name followed by a colon and the VNC port (e.g., `station07.fsc00.arh.pub.ro:5903`).
Click **Connect**, then enter your **VNC session password** (not your account password).
If successful, you will see your remote desktop.
You can now open a terminal and launch Vivado:
vivado
FAQ
Q: I cannot connect to my VNC session. A: Connect via SSH and check with `vncserver -list`. Ensure the VNC server was started with `-localhost no`.
Q: I cannot connect via SSH; my workstation appears to be powered off. A: Some students turn off the stations despite instructions. Contact a system administrator to power it on remotely.
Q: I can connect to VNC, but I see a login screen and an "Authentication error" message. A: This is a [known bug](https://askubuntu.com/questions/1224957/i-cannot-log-in-a-vnc-session-after-the-screen-locks-authentification-error) in TigerVNC. While connected via VNC, open an SSH session and run:
loginctl unlock-sessions


