Applications 2
Exercise 1 : 1 bit adder
Module declaration
Any Verilog circuit or block is enclosed within the keywords module and endmodule. The module keyword is followed by the name of the module. This name begins with a letter (Verilog is case-sensitive) or underscore (_), uses alphanumeric characters and underscores and should be a descriptive one (adder, adder_32, counter, lshift_register, Serial_to_Parallel_converter).
Right after the module name comes the interface. The interface is the list of port declarations, separated by commas and enclosed within parentheses. It is strongly recommended to declare each port on a separate line, even if some ports have the same direction and size. Also it is recommended to group the declarations by their direction. A port declaration starts with the keyword that defines the port's direction: input or output. For one-bit ports the declaration comprises only the direction and the name. Port names follow the same rules as module names. A port name should be a unique identifier inside the module's code - its scope is limited to the module.
A multi-bit port declaration defines the width of the port through two indices within brackets and separated by a colon: [msb:lsb]. The first index denotes the most significant bit (MSB), the second one is the least significant bit. MSB should always be greater than MSB. Usually the LSB index is 0, therefore if the width of the port is N, the first index would be N-1.
The module declaration comprises the keyword module, the module name and its interface, and ends with a semicolon:
module adder (      // keyword '''module''' followed by the module's name and the opening parenthesis of the interface
    input a,        // one-bit input port named 'a'
    input b,        // one-bit input port named 'b'
    output [1:0] c  // two-bit output port. Bit 1 is MSB, bit 0 is LSB. There is no comma after the last port declaration
);                  // the closing parenthesis of the interface and the semicolon that ends the module's declaration
Module description
Anything written between the module's declaration and the keyword endmodule is part of the module's description.
A module may be described by what it does. This is a behavioral description. Very simple modules could be described using a single instruction, that assigns to the outputs the result value of an expression over the inputs. Because Verilog is a description language, not a programming language, the assignments that describe how logic values are generated from other logic values are attached to special Verilog keywords. One such keyword is assign. It is followed by a single assignment: assign y = E(x1, x2, ... xN) It is forbidden to use the left-hand variable inside the right-hand expression.
The one-bit adder may be described by a simple expression that computes the output value as the addition of its inputs:
assign c = a + b; // variable c is always equal to the sum of a and b
The assign statement describes something that is continuously evaluated. It may be viewed as a small black box with an output and some inputs. The left-hand variable is updated immediately whenever any of the variables in the right-hand expression changes its value. The physical circuit that implements the assign statement is a combinational logic circuit that reacts immediately to any change of its inputs.
The whole code of the adder module:
module adder (
    input a,
    input b,
    output [1:0] c
);

assign c = a + b;

endmodule
testbench source file for the adder
- New Verilog HDL File
- module moduleName_tb endmodule
- the testbench module has no pins!
- declare logic variables reg varName
- wire declarations, mandatory for multibit outputs
- instantiation moduleName instanceName Usualy, the top-level design module instantiated in the testbench is named dut (device under test)
- connections connect testbench variables to instance pins: .modulePin(varName)
generate stimuli for dut inside the testbench
- initial
- begin/end if more than one instruction in a block
- assignments varName=value
- literals, decimal literals, binary literals
- delay #delayValue
Exercise 2
design source file for the 2 by 2 bit multiplier
- operators in expressions
testbench source file for the 2 by 2 bit multiplier
- control instructions: repeat (nrOfIterations)
- parallel initial blocks
Exercise 3
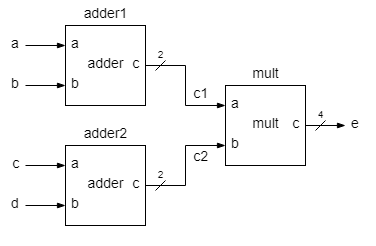
design source file for top-level entity Multilevel hierarchy. Mixed description: top-level - structural description, low-level - behavioral description.
- same module type, different instance names
- internal wires for interinstance connections
testbench source file for the top-level entity
- concatenation operator {varName1, varName2, ...}
- $monitor(%b...,varName1,...)
- format specifiers %b for binary (logic) values, %d for decimal values


